
I’m teaching myself modern data streaming architectures on AWS, and Apache Kafka is one of the key technologies, which can be used for messaging, activity tracking, stream processing and so on. While applications tend to be deployed to cloud, it can be much easier if we develop and test those with Docker and Docker Compose locally. As the series title indicates, I plan to publish articles that demonstrate Kafka and related tools in Dockerized environments. Although I covered some of them in previous posts, they are implemented differently in terms of the Kafka Docker image, the number of brokers, Docker volume mapping etc. It can be confusing, and one of the purposes of this series is to illustrate reference implementations that can be applied to future development projects. Also, I can extend my knowledge while preparing for this series. In fact Kafka security is one of the areas that I expect to learn further. Below shows a list of posts that I plan for now.
- Part 1 Cluster Setup (this post)
- Part 2 Management App
- Part 3 Kafka Connect
- Part 4 Producer and Consumer
- Part 5 Glue Schema Registry
- Part 6 Kafka Connect with Glue Schema Registry
- Part 7 Producer and Consumer with Glue Schema Registry
- Part 8 SSL Encryption
- Part 9 SSL Authentication
- Part 10 SASL Authentication
- Part 11 Kafka Authorization
Setup Kafka Cluster
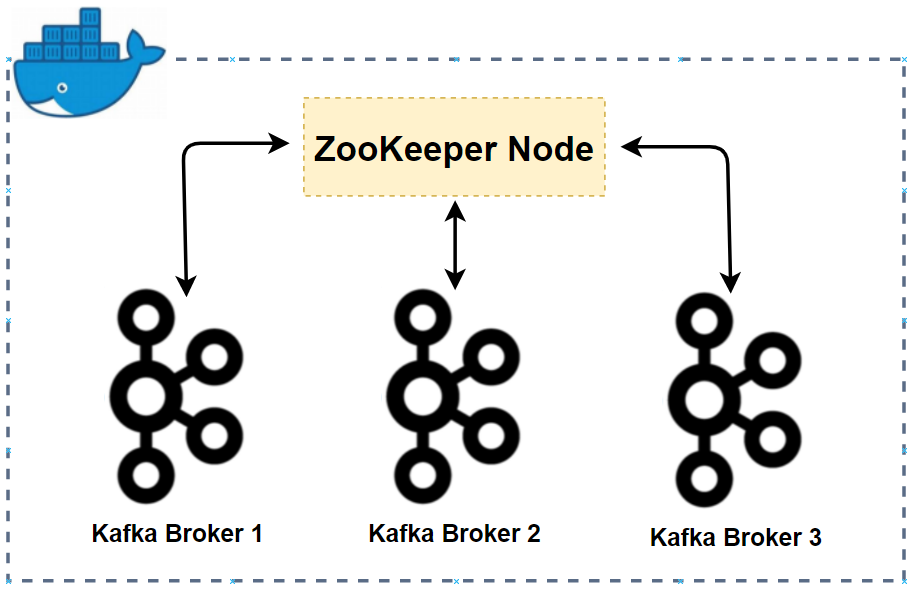
We are going to create a Kafka cluster with 3 brokers and 1 Zookeeper node. Having multiple brokers are advantageous to test Kafka features. For example, the number of replication factor of a topic partition is limited to the number of brokers. Therefore, if we have multiple brokers, we can check what happens when the minimum in-sync replica configuration doesn’t meet due to broker failure. We also need Zookeeper for metadata management - see this article for details about the role of Zookeeper.
Docker Compose File
There are popular docker images for Kafka development. Some of them are confluentinc/cp-kafka from Confluent, wurstmeister/kafka from wurstmeister, and bitnami/kafka from Bitnami. I initially used the image from Confluent, but I was not sure how to select a specific version of Kafka - note the recommended Kafka version of Amazon MSK is 2.8.1. Also, the second image doesn’t cover Kafka 3+ and it may be limited to use a newer version of Kafka in the future. In this regard, I chose the image from Bitnami.
The following Docker Compose file is used to create the Kafka cluster indicated earlier - it can also be found in the GitHub repository of this post. The resources created by the compose file is illustrated below.
- services
- zookeeper
- A Zookeeper node is created with minimal configuration. It allows anonymous login.
- kafka-[id]
- Each broker has a unique ID (KAFKA_CFG_BROKER_ID) and shares the same Zookeeper connect parameter (KAFKA_CFG_ZOOKEEPER_CONNECT). These are required to connect to the Zookeeper node.
- Each has two listeners - INTERNAL and EXTERNAL. The former is accessed on port 9092, and it is used within the same Docker network. The latter is mapped from port 9093 to 9095, and it can be used to connect from outside the network.
- [UPDATE 2023-05-09] The external ports are updated from 29092 to 29094, which is because it is planned to use 9093 for SSL encryption.
- [UPDATE 2023-05-15] The inter broker listener name is changed from CLIENT to INTERNAL.
- Each can be accessed without authentication (ALLOW_PLAINTEXT_LISTENER).
- zookeeper
- networks
- A network named kafka-network is created and used by all services. Having a custom network can be beneficial when services are launched by multiple Docker Compose files. This custom network can be referred by services in other compose files.
- volumes
- Each service has its own volume that will be mapped to the container’s data folder. We can check contents of the folder in the Docker volume path. More importantly data is preserved in the Docker volume unless it is deleted so that we don’t have to recreate data every time the Kafka cluster gets started.
- Docker volume mapping doesn’t work as expected for me with WSL 2 and Docker Desktop. Therefore, I installed Docker and Docker Compose as Linux apps on WSL 2 and start the Docker daemon as
sudo service docker start. Note I only need to run the command when the system (WSL 2) boots, and I haven’t found a way to start it automatically.- [UPDATE 2023-08-17] A newer version of WSL2 (0.67.6+) supports Systemd on Windows 11. I updated my WSL version (
wsl --update) and was able to start Docker automatically by enabling Systemd in /etc/wsl.conf.#/etc/wsl.conf [boot] systemd=true
- [UPDATE 2023-08-17] A newer version of WSL2 (0.67.6+) supports Systemd on Windows 11. I updated my WSL version (
 1# /kafka-dev-with-docker/part-01/compose-kafka.yml
 2version: "3.5"
 3
 4services:
 5  zookeeper:
 6    image: bitnami/zookeeper:3.5
 7    container_name: zookeeper
 8    ports:
 9      - "2181"
10    networks:
11      - kafkanet
12    environment:
13      - ALLOW_ANONYMOUS_LOGIN=yes
14    volumes:
15      - zookeeper_data:/bitnami/zookeeper
16  kafka-0:
17    image: bitnami/kafka:2.8.1
18    container_name: kafka-0
19    expose:
20      - 9092
21    ports:
22      - "29092:29092"
23    networks:
24      - kafkanet
25    environment:
26      - ALLOW_PLAINTEXT_LISTENER=yes
27      - KAFKA_CFG_ZOOKEEPER_CONNECT=zookeeper:2181
28      - KAFKA_CFG_BROKER_ID=0
29      - KAFKA_CFG_LISTENER_SECURITY_PROTOCOL_MAP=INTERNAL:PLAINTEXT,EXTERNAL:PLAINTEXT
30      - KAFKA_CFG_LISTENERS=INTERNAL://:9092,EXTERNAL://:29092
31      - KAFKA_CFG_ADVERTISED_LISTENERS=INTERNAL://kafka-0:9092,EXTERNAL://localhost:29092
32      - KAFKA_CFG_INTER_BROKER_LISTENER_NAME=INTERNAL
33    volumes:
34      - kafka_0_data:/bitnami/kafka
35    depends_on:
36      - zookeeper
37  kafka-1:
38    image: bitnami/kafka:2.8.1
39    container_name: kafka-1
40    expose:
41      - 9092
42    ports:
43      - "29093:29093"
44    networks:
45      - kafkanet
46    environment:
47      - ALLOW_PLAINTEXT_LISTENER=yes
48      - KAFKA_CFG_ZOOKEEPER_CONNECT=zookeeper:2181
49      - KAFKA_CFG_BROKER_ID=1
50      - KAFKA_CFG_LISTENER_SECURITY_PROTOCOL_MAP=INTERNAL:PLAINTEXT,EXTERNAL:PLAINTEXT
51      - KAFKA_CFG_LISTENERS=INTERNAL://:9092,EXTERNAL://:29093
52      - KAFKA_CFG_ADVERTISED_LISTENERS=INTERNAL://kafka-1:9092,EXTERNAL://localhost:29093
53      - KAFKA_CFG_INTER_BROKER_LISTENER_NAME=INTERNAL
54    volumes:
55      - kafka_1_data:/bitnami/kafka
56    depends_on:
57      - zookeeper
58  kafka-2:
59    image: bitnami/kafka:2.8.1
60    container_name: kafka-2
61    expose:
62      - 9092
63    ports:
64      - "29094:29094"
65    networks:
66      - kafkanet
67    environment:
68      - ALLOW_PLAINTEXT_LISTENER=yes
69      - KAFKA_CFG_ZOOKEEPER_CONNECT=zookeeper:2181
70      - KAFKA_CFG_BROKER_ID=2
71      - KAFKA_CFG_LISTENER_SECURITY_PROTOCOL_MAP=INTERNAL:PLAINTEXT,EXTERNAL:PLAINTEXT
72      - KAFKA_CFG_LISTENERS=INTERNAL://:9092,EXTERNAL://:29094
73      - KAFKA_CFG_ADVERTISED_LISTENERS=INTERNAL://kafka-2:9092,EXTERNAL://localhost:29094
74      - KAFKA_CFG_INTER_BROKER_LISTENER_NAME=INTERNAL
75    volumes:
76      - kafka_2_data:/bitnami/kafka
77    depends_on:
78      - zookeeper
79
80networks:
81  kafkanet:
82    name: kafka-network
83
84volumes:
85  zookeeper_data:
86    driver: local
87    name: zookeeper_data
88  kafka_0_data:
89    driver: local
90    name: kafka_0_data
91  kafka_1_data:
92    driver: local
93    name: kafka_1_data
94  kafka_2_data:
95    driver: local
96    name: kafka_2_data
Start Containers
The Kafka cluster can be started by the docker-compose up command. As the compose file has a custom name (compose-kafka.yml), we need to specify the file name with the -f flag, and the -d flag makes the containers to run in the background. We can see that it creates the network, volumes and services in order.
 1$ cd kafka-dev-with-docker/part-01
 2$ docker-compose -f compose-kafka.yml up -d
 3# Creating network "kafka-network" with the default driver
 4# Creating volume "zookeeper_data" with local driver
 5# Creating volume "kafka_0_data" with local driver
 6# Creating volume "kafka_1_data" with local driver
 7# Creating volume "kafka_2_data" with local driver
 8# Creating zookeeper ... done
 9# Creating kafka-0   ... done
10# Creating kafka-2   ... done
11# Creating kafka-1   ... done
Once created, we can check the state of the containers with the docker-compose ps command.
1$ docker-compose -f compose-kafka.yml ps
2#   Name                 Command               State                                    Ports
3# -----------------------------------------------------------------------------------------------------------------------------
4# kafka-0     /opt/bitnami/scripts/kafka ...   Up      9092/tcp, 0.0.0.0:9093->9093/tcp,:::9093->9093/tcp
5# kafka-1     /opt/bitnami/scripts/kafka ...   Up      9092/tcp, 0.0.0.0:9094->9094/tcp,:::9094->9094/tcp
6# kafka-2     /opt/bitnami/scripts/kafka ...   Up      9092/tcp, 0.0.0.0:9095->9095/tcp,:::9095->9095/tcp
7# zookeeper   /opt/bitnami/scripts/zooke ...   Up      0.0.0.0:49153->2181/tcp,:::49153->2181/tcp, 2888/tcp, 3888/tcp, 8080/tcp
Produce and Consume Messages
I will demonstrate how to produce and consume messages with Kafka command utilities after entering into one of the broker containers.
Produce Messages
The command utilities locate in the /opt/bitnami/kafka/bin/ directory. After moving to that directory, we can first create a topic with kafka-topics.sh by specifying the bootstrap server, topic name, number of partitions and replication factors - the last two are optional. Once the topic is created, we can produce messages with kafka-console-producer.sh, and it can be finished by pressing Ctrl + C.
 1$ docker exec -it kafka-0 bash
 2I have no name!@b04233b0bbba:/$ cd /opt/bitnami/kafka/bin/
 3## create topic
 4I have no name!@b04233b0bbba:/opt/bitnami/kafka/bin$ ./kafka-topics.sh \
 5  --bootstrap-server localhost:9092 --create \
 6  --topic orders --partitions 3 --replication-factor 3
 7# Created topic orders.
 8
 9## produce messages
10I have no name!@b04233b0bbba:/opt/bitnami/kafka/bin$ ./kafka-console-producer.sh \
11  --bootstrap-server localhost:9092 --topic orders
12>product: apples, quantity: 5
13>product: lemons, quantity: 7
14# press Ctrl + C to finish
Consume Messages
We can use kafka-console-consumer.sh to consume messages. In this example, it polls messages from the beginning. Again we can finish it by pressing Ctrl + C.
1$ docker exec -it kafka-0 bash
2I have no name!@b04233b0bbba:/$ cd /opt/bitnami/kafka/bin/
3## consume messages
4I have no name!@b04233b0bbba:/opt/bitnami/kafka/bin$ ./kafka-console-consumer.sh \
5  --bootstrap-server localhost:9092 --topic orders --from-beginning
6product: apples, quantity: 5
7product: lemons, quantity: 7
8# press Ctrl + C to finish
Note on Data Persistence
Sometimes we need to remove and recreate the Kafka containers, and it can be convenient if we can preserve data of the previous run. It is possible with the Docker volumes as data gets persisted in a later run as long as we keep using the same volumes. Note, by default, Docker Compose doesn’t remove volumes, and they remain even if we run docker-compose down. Therefore, if we recreate the containers later, data is persisted in the volumes.
To give additional details, below shows the volumes created by the Docker Compose file and data of one of the brokers.
 1$ docker volume ls | grep data$
 2# local     kafka_0_data
 3# local     kafka_1_data
 4# local     kafka_2_data
 5# local     zookeeper_data
 6$ sudo ls -l /var/lib/docker/volumes/kafka_0_data/_data/data
 7# total 96
 8# drwxr-xr-x 2 hadoop root 4096 May  3 07:59 __consumer_offsets-0
 9# drwxr-xr-x 2 hadoop root 4096 May  3 07:59 __consumer_offsets-12
10
11...
12
13# drwxr-xr-x 2 hadoop root 4096 May  3 07:59 __consumer_offsets-6
14# drwxr-xr-x 2 hadoop root 4096 May  3 07:58 __consumer_offsets-9
15# -rw-r--r-- 1 hadoop root    0 May  3 07:52 cleaner-offset-checkpoint
16# -rw-r--r-- 1 hadoop root    4 May  3 07:59 log-start-offset-checkpoint
17# -rw-r--r-- 1 hadoop root   88 May  3 07:52 meta.properties
18# drwxr-xr-x 2 hadoop root 4096 May  3 07:59 orders-0
19# drwxr-xr-x 2 hadoop root 4096 May  3 07:57 orders-1
20# drwxr-xr-x 2 hadoop root 4096 May  3 07:59 orders-2
21# -rw-r--r-- 1 hadoop root  442 May  3 07:59 recovery-point-offset-checkpoint
22# -rw-r--r-- 1 hadoop root  442 May  3 07:59 replication-offset-checkpoint
If you want to remove everything including the volumes, add -v flag as shown below.
 1$ docker-compose -f compose-kafka.yml down -v
 2# Stopping kafka-1   ... done
 3# Stopping kafka-0   ... done
 4# Stopping kafka-2   ... done
 5# Stopping zookeeper ... done
 6# Removing kafka-1   ... done
 7# Removing kafka-0   ... done
 8# Removing kafka-2   ... done
 9# Removing zookeeper ... done
10# Removing network kafka-network
11# Removing volume zookeeper_data
12# Removing volume kafka_0_data
13# Removing volume kafka_1_data
14# Removing volume kafka_2_data
Summary
In this post, we discussed how to set up a Kafka cluster with 3 brokers and a single Zookeeper node. A simple example of producing and consuming messages are illustrated. More reference implementations in relation to Kafka and related tools will be discussed in subsequent posts.


Comments